Item - Online Store Tab
Items > Item Management > (Select Item) > Online Store
This page is available on items with the Published Online attribute.
-
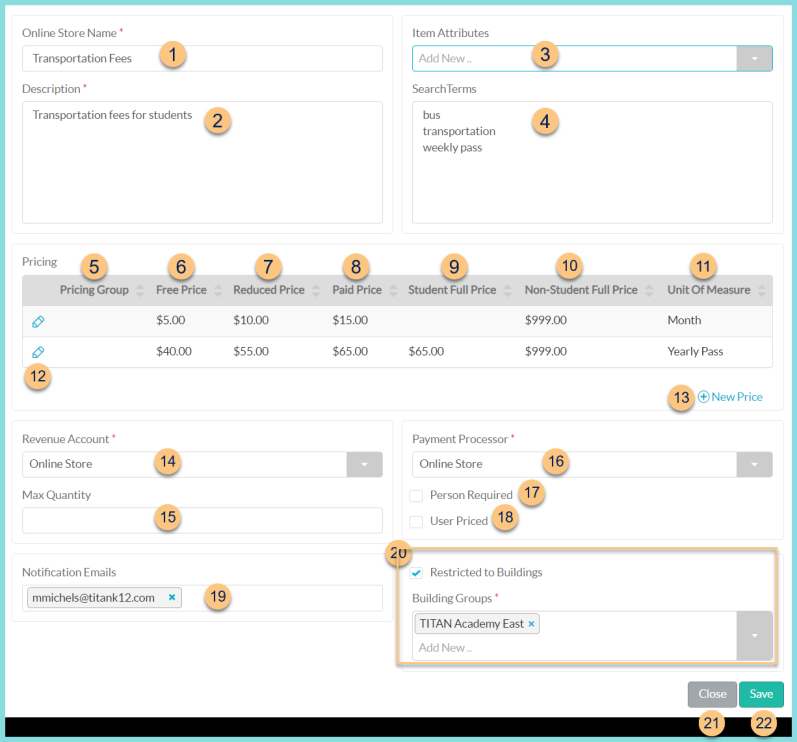
Online Store Name - enter the name as it should appear in the online store. Default: Item Name
-
Description - enter a description that will appear in the online store
-
Item Attributes - select item attribute(s) that apply
-
Search Terms (optional) enter search terms that apply to aid in parents finding the item in the online store
-
Pricing Group - click to sort by pricing group
-
Free Price - click to sort by Free Price
-
Reduced Price - click to sort by Reduced Price
-
Paid Price - click to sort by Paid Price
-
Student Full Price - click to sort by Student Full Price
-
Non-Student Full Price - click to sort by Non-Student Full Price
-
Unit of Measure - click to sort by unit of measure
-
Pencil - click to edit pricing details

-
Eligibility Based Pricing - check to indicate that the pricing is based on eligibility status. If unchecked, only a Student and Non-Student price are entered.
-
Unit of Measure - select the published unit of measure
-
Pricing Group (optional) - select the pricing group for this set of prices. Note: Remember to repeat step 13 for each pricing group and add a non-pricing group line item for the non-student price and any students that do not fit into one of the defined pricing groups.
-
Free Price (eligibility based pricing only) - price to be charged to students with free eligibility
-
Reduced Price (eligibility based pricing only) - price to be charged to students with reduced eligibility
-
Paid Price (eligibility based pricing only) - price to be charged to students with paid eligibility and No-ID Students
Student Full Price (not pictured, non-eligibility based pricing only) - price to be charged to students -
Non-Student Full Price - price to be charged to non-students
-
Delete - click to delete item price
-
Cancel - click to return to the previous screen without saving changes
-
Save - click to save changes
-
(+) New Price - click to add a new price. See Step 12 for details.
-
Revenue Account - select the account for revenue from this item
-
Max Quantity - enter the maximum quantity that can be purchased at a time
-
Payment Processor - select the merchant account that the payment for this item will route through
-
Person Required - check to indicate that this item must be purchased on behalf of a selected person
-
User Priced - check to indicate that the user is allowed to enter the amount to be paid
-
Notification Emails - enter email address(es) to be notified via email any time this item is purchased
-
Restricted to Buildings
Checked - this item is only available to be purchased by LINQ Connect accounts linked to the selected buildings. Select the building(s) or building group(s) in the Building Groups field. -
Close - click to return to Item Management without saving changes
-
Save - click to save changes